Monday, December 28, 2009

One Light

Been on vacation the past week and this week, so not much to post. Well...lots of pics but I will wait until I get back home to pick some out for the gallery.

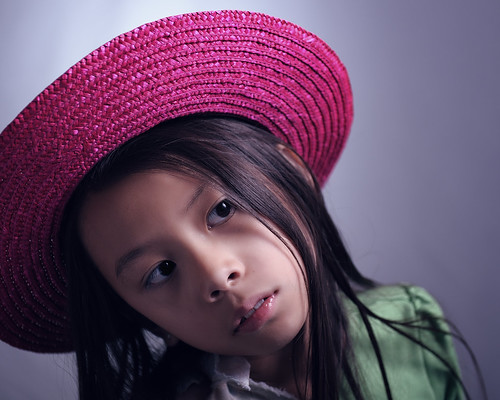
I was able to get a few shoots in with Trish while in SJ. Here's one with a simple $20 Sunpak w/DIY snoot and grid. The snoot is made from a Foamie craft sheet, while the grid is made with a bunch of cut up straws. The Sunpak from ebay, used. You can do this for about $25 easily. Trish's sister hand held the flash.

D7A_2825

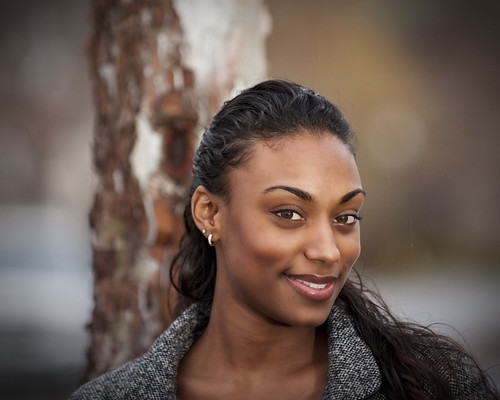
This was just before sunset. It was cloudy and if you look carefully, it started to rain. I wanted to blend the back ground light into the shot, but obviously, if I exposed for the back ground ambient, then the subject's face would be a bit too dark. Plus the subject's face would be a bit flat since there were no real directional light. Remember the clouds are like a giant softbox. It softens the light every where. This is why I used a simple flash+snoot+grid.

The snoot limits the lights splash and the grid helps soften the edge of the light. This allows for a slight glow of light on Trish's face and upper body only. The light drops off pretty quickly so the tree behind her is not overly bright either. Since the flash is hand held, you can easily fine tune the light intensity be having the flash move a bit closer or further.

I shot this with my D700, Nikkor 70-200mm f/2.8 VR @ 200mm f/2.8 1/100s ISO 640. If we had more time (due to the rain), I would have taken another shot at f/3.5 or f/4 to see what I like better in the end. The DOF is nice on this one, but I would have liked to see a bit more behind Trish.

Anyway, just another example of something you can do with inexpensive, used flash, if you wanted to give off camera flash is try.

Thursday, December 17, 2009

backdrop color

Something to keep in mind. There are times when you want a specific backdrop color, but depending on what you want out of it, you don't always have to change the actual backdrop.

Gels - in one of my previous post, gels are cheap to get. With a basic white backdrop, you can throw a gelled flash to change the color of the back ground color.

Here's one with a green gel
D7D_9405

Here's a blue gel.
blue

You don't even have to use a gel to change the backdrop color shade. Often, you will see off white/gray backdrop. With a white sheet/backdrop, you can manage the light fall off, which will create a shade of gray. Here's one with a plain white bed sheet.
D7D_2629

Placing the key light, shooting through the umbrella, close to the subject, you can lower the power of the strobe. This means less light will reach the white sheet and reflect back to the camera. In the example above, I also added an accent light, a Sunpak 422D on the ground, pointing up at the sheet to give the area around Ashley's head a bit of a glow behind it.

Monday, December 14, 2009

inexpensive macro

I had this reversing ring for a while now. I'm personally not really into macro shots, but it's fun at times. This past week, I had an idea about some macro shots and dug out my reversing ring. Couple of quick shots from yesterday:

I started out with an idea about a broccoli macro, but I did not like what I got.
GTXF #6 - broccoli

Then I got the idea to shoot the TrackPoint from an IBM laptop.
GTXF #6 - IBM

The above shots were pretty simple. The reversing ring is about $15. On one end, it has the lens mount which you mount onto your camera. On the other end, it's just a filter thread. The most common is the 52mm which is what is on the 50mm lens. You screw the ring onto the 50mm lens like a filter. Now you have the 50mm lens mounted backwards on your camera. Be careful now, since the inside glass is now exposed, so don't hit anything with it.

Since the ring is just a "ring", it will not meter and auto focus with your lens. It's not hard though. Just move the camera closer or away to focus and take a test shot to see the exposure and then adjust...until you find the correct exposure (see my exposure triangle post if you need more info on what affects exposure)

On the two shots above, I used a Sunpak 422D manual flash with a DIY snoot to help light the object.

Thursday, December 10, 2009

Light budget - revisit

So, the question came up recently and I thought it would be a good time to do a quick revisit about all the lights I have. If you are on a tight budget, or if you are not, but just don't want to spend a lot of money on strobes for studio/portrait use, then you don't have to! Basically, everything you see in the picture cost about the same as ONE new SB-900!

Here's my studio lights
strobing on a budget

Lights: from left to right
285HV new $90 (used is even cheaper, I didn't know better at the time :) )
Sunpak used $20
Sunpak used $25
no name auto: free
Flashpoint 320A Mono new: $99
Total: $234

Accessories:
Light Stand x 4 @ $30 = $120
301 RF trigger x 4 = $60
Umbrella holder x 2 = $35
Umbrella x 2 (not shown) = $35
Total accessories: $250

Total Studio lights and accessories = $484. Of course, you can find some of the stuff used and drop the cost even more.

And, no, I still bought a SB-900, but it's because of the event type stuff I'm shooting and I need the iTTL and the SB-900 is great for that. But, for studio type stuff, I still use my budget lights exclusively. Why not. They work great as well.

Wednesday, December 9, 2009

SB-900 and iTTL

Speaking of the SB-900 (see previous post), I shot the kids dance studio performance this past Saturday. I used the SB-900, on camera, with iTTL. This is the primary reason I bought the SB-900. Over 400 shots and the SB-900 never let me down.

At 120mm and f/5.6
D7A_2291

or 78mm, up close and wide open at f/2.8
D7A_2395

Didn't have to touch a thing, just keep shooting.

Some tips. With any hot shoe flash, the more power you push, the longer it will take to charge up before the next shot. In situations where you may need a few rapid shots, you can't afford to shoot at 3/4 or full power because couple of seconds is like a life time in a fast pace shoot. To help reduce the amount of power you need from the flash, shoot at ISO 400. With the D700 (I love this camera), ISO 400 is a no brainer. Heck, you can push it up to ISO 800 and still get awesome low noise, high quality shots.

You can also open the lens up. The difference between f/2.8 and f/4 is one stop. It is basically the difference between ISO 200 and ISO 400. Just be aware of how much ambient light you want in on your shot. Don't forget the Triangle!

Tuesday, December 8, 2009

Shooting at the sun w/SB-900

Been super busy, so will keep this a bit short. In the previous post, you can see I took the kids out to the park. It was a beautiful day. I've read some issues about the SB-900, or, really more about the Nikon Advance Wireless Lighting (AWL) which can use the pop up flash in my D700 as the commander to trigger the SB-900 off camera.

Two issues I've seen.

One is the line of sight for the flash. Since it is not based on radio frequency, the light signal from the pop up flash will not bend or go through walls to reach the SB-900.

The other is too much light. This is the case I may have ran into. I did not set out to test either of the above. And, if you want more technical info, there are plenty out there. Just sharing my personal experience here.

In the photo below, you can see I was shooting into the sun. It was a bright day as well. The SB-900 was camera right, under direct sun light, as well as my D700. I took a few and the SB-900 would not trigger.
D7A_2075

I move the SB-900 to camera left. Be sure to rotate the flash head 180 degree so the AWL sensor is now facing the D700 on the right now. With the SB-900 on the left side of the camera, now it is in the shade and triggered without any issues.
D7A_2076

The SB-900 is still a great flash to have around. I have no regrets at all in getting it, even though it cost more than all the equipment you see here:
strobing on a budget

But none of the equipment above is going to let me shoot iTTL and high speed sync like the 2nd photo above, which was shot at 1/8000s!

Wednesday, December 2, 2009

Swings

Last Friday was awesome. Mid 70's. Took the kids out to the park for some relaxation and snapped a few.

SB-900 camera right, held by Kylie's auntie.
swings...it never gets old

Chloe day dreaming. SB-900 camera left.
day dream

Flash not required. You don't always have to light up the faces :)
flash not required