Saturday, October 31, 2009

DOF example

Here's a quick one today...an example of how DOF can make or break a picture. In the picture below, it is a portrait. When shooting a single head shot, you can get very creative with DOF, but when you are doing more than one person, especially a small group, DOF can easily make or break your shot, especially if you want to be more creative with DOF use.

Details: D700 (full frame) at 200mm focal length, f/2.8. I didn't measure exactly how far I was away from the subject, but I estimate about 8 to 9 feet.
dof example

See how DOF (area of focus between the front plane and rear plane) is razor thin? In this case, Ashley is easily outside of that area of focus. How thin is the focus area anyway? How do you calculate this? Simple, just use a DOF calculator. In the above example, the DOF is about 1" to 1.5". Pretty thin for a two person portrait...too thin. But, do able, if you understand what is going on and ensure both person's eyes are on the same plane.

There are a bunch on the web and I personally like this one:
http://www.dofmaster.com/dofjs.html

I also have a cheat sheet for situation where I want to be more precise. Different shots require different level of precision. If I was shooting wider at a shorter focal length, the difference between, say, f/8 and f/11 may not matter much.

Here's another example. Taken with a D700 at 63mm f/5.6 and about 8 feet. In this case, it prob. would be fine at f/4 with some care, and at f/8 you would not notice any difference compared to f/5.6. Why? Look at the DOF calculations for each aperture below. There's plenty of room in the area of focus.

f/4 = 1.16' about 14". Pretty thick, but with three kids, you want to pay a bit more attention.
f/5.6 = 1.64' about 20". Plenty thick
f/8 = 2.35' about 28". Prob. overkill, but there are no foreground objects and the background is just a white sheet, so it really does not matter. (what will matter is how much light f/8 will reduce and change your exposure quite a bit)

Evil Kylie :)

Wednesday, October 28, 2009

gels

If you have not gotten any gels, go and get some. You can check out adorama or B&H to see what rosco sample packs they have available. Even if you just get them and pay the shipping, they are still a bargain, even better, next time you place an order with them, have them add a couple of sample packs.
365.092 - gels gels gels

Flash is fun, but add gels, it's not only more fun, but you also need it to help tune your white balance. We'll talk more about WB another time. Today, just think about getting some gels soon.

A simple blue gel on a $20 sunpak flash behind and another $25 sunpak for the key light:
American Idol - 4

Here's the setup shot. There was plenty of ambient room light, but that matters little (see my blog about working with ambient light)
setup shot

Here's another with multiple gel colors:
52.02 - gels

The setup shot:
setup for 52.02

Tuesday, October 27, 2009

Lighting stirkes - just like a big strobe

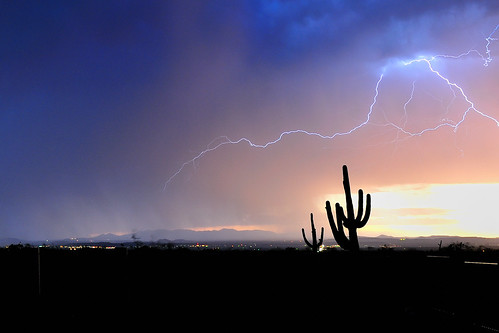
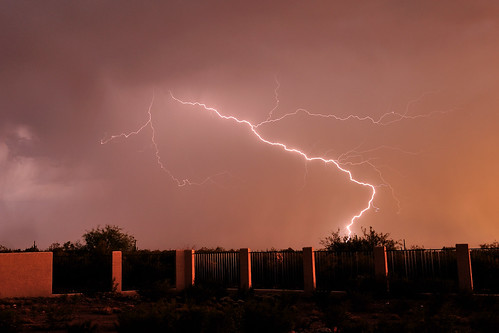
Out of coincidence, two days ago, someone on a flickr group asked for tips on taking pictures of lighting strikes. Then last evening, around twilight, a storm moved close and we had a few strikes. Nothing spectacular or any thing. In fact, this monsoon season has been weak...very weak. Anyway, I grabbed the D700, stuck it on a tripod and snapped a few.
D7A_8140

This is only the second time I've tried to capture lighting strikes. Last year I tried it on my D40 and a 50mm. I didn't really think much of it and just experimented. Got some OK shots, but no big deal. With all the books and reading I've been doing for the past 7 months about strobes and off camera flash, from studio portraits to outdoor fun...etc., I figure I share a bit of the concept of capturing lighting strikes in terms of the "light".

Think of lighting strikes as a big giant strobe. When it goes off, it's not much different than if you had a big strobe down the street flashing at you. Now, go back and think about what I wrote in my previous blog on the effects of flash and ambient light, and how to work with both to get what you want. If you recall, I said the shutter speed basically have no affect on the light from the flash. This is similar in concept for simple captures of lighting strikes. Why? I mean, you can see the lighting strike lasting a lot longer then your flash or strobe, so I understand the idea of when a flash goes off for only 1/8000s and thus the shutter has no affect...but...

:) without getting too technical, here's why. The distance of the lighting strike from your camera, the short duration and the ambient light. For most of us, we are not going to have a light detecting camera shutter trigger to time the lighting strike just as it happens. If you had, you can set the exposure to just expose for the light from the bolt. But, even then, if it's darkish, you can have the shutter open for much longer than the lighting strike (see the test below with the flash) duration since the light will quickly dissipate and not cause an over exposure.

For those of us without the light detecting trigger, this is what you do. First, you want to set the camera on a tripod. Now, set the shutter to 8 to 13 seconds. Yes, seconds. Depending on the ambient, you can increase or shorten the shutter speed. Set the ISO to 400. Now set the aperture to f/8 and just start shooting. I'm sure you will get lucky and capture a few strikes.

Why does the above work? Let's break this down a bit...

1) shutter speed. Most of the time, you will be shooting at night, so you can have a long shutter speed, which will let in more light. This helps with getting ambient light for the exposure. Because the lighting strike is quick, it does not matter much having the shutter opened for so long.

Think of the light from a strike (or your flash) as a cup of water. A big thick towel on the floor as the camera sensor. If I pour the cup of water on the towel, it will get wet, but it will only get as wet as a cup of water, 8 oz, that's it! No more, no less. Now, think of the same thing again and this time, it's outside and drilling rain. A very light drizzle. If you leave the towel out for 10 seconds, it will start to get wet, but how wet depends on how heavy the drizzle. So, now picture the drizzle as ambient light...if it's not very bright, it's like a very light drizzle. To get more light (or the towel more wet) on to the sensor, you need to leave the shutter open longer (leave the towel out longer). Back to the towel...light drizzle, put the towel out, after 2 seconds, barely moist...now dump the cup of water on the towel...splash! You just got the towel wet by an amount of 8 oz of water...this is like the light flashing to the camera sensor.

Even after you dump the cup of water on the towel, it is only going to get more wet from the light drizzle, which is not much...even if you leave it out for another 5 seconds longer, it's not going to get much more wet than what the cup of water had already done...get the point? This is why shutter speed does not affect short burst of light, like a flash.

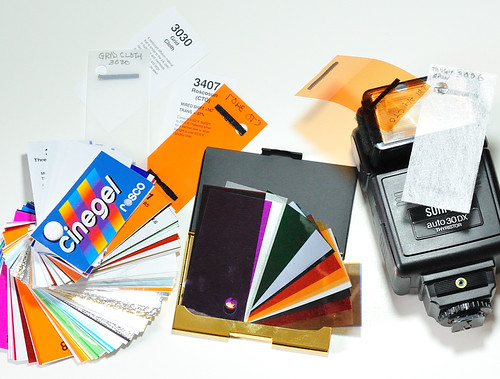
2) Aperture. This actually has a major impact on the light from the strike. It will also have some affect on the ambient, but with a long shutter speed, the affect can be minimal. Depending on how close and how big/bright the strike is, you will need to fine tune the aperture a bit. If you have a big storm close to you and some spectacular big long strikes, you may want to up the aperture to f/11 or more, to get a better exposure of the bolt. To get see the affect of this, just use a flash. Set it to manual and 1/2 power with the camera on a tripod (using a 50mm or something similar), point it down the street and set the focus to infinity. Set the camera up as noted above, ISO400, f/8, 10 second shutter and at night, have someone walk 100 feet from the camera. Click the shutter and have that person fire off the flash. Now change the f/stop to f/11 and do it again. See how the flash's light coverage diminishes, while your ambient lit areas are the same? Same idea with the lighting bold.

3) ISO. I start with 400 because I found it works well with the lighting strikes I see, distance and intensity wise when it is combined with the starting point setting above for the exposure. Bump this up or lower it as you need, to help get the right exposure you are after. Remember, you don't want to bump it up too much because of noise.

Here's another example that I shot with more ambient light in the exposure.
D7A_8167

Flash and Ambient Light

A quick one today about flash and how to use ambient light. One thing that some people forget about the flash is that it goes of at about 1/2000s to 1/8000s. Some can go even faster. In most cases, the shutter speed have little to no affect on the light from the flash. This can be confusing since we normally think of the shutter speed as something that controls the light getting to the sensor.

The shutter does affect the light going to the sensor. So, why did I just say the shutter have little to no affect on the light from the flash. It's because the burst of light from the flash is very very fast. Like I said, some will burst in as little as 1/8000 of a second, or even faster! The difference is the intensity of the light from the flash compared to the ambient light. Imagine a semi dark room. If I take a picture at 1/200s, ISO 200 and f/5.6, the picture will be almost completely dark. Now, with the flash, at the exact same setting, my picture is perfect...well...not so quick...it will only be perfect if the intensity of the flash is set correctly. If I set it too high, then it will be over exposed, if I set it too low for my subject, it will be underexposed.

This is also where TTL comes in. TTL stands for Through The Lens. There are various version of TLL now, unlike the old days of film. The latest Nikons are iTTL. The flash will fire off a test burst of light and measure the light bouncing back from the subject through the lens and adjust accordingly. iTTL, Auto mode, Manual mode flash will be another time...today, we're talking about how ambient light can be used to flash lighting.

First example, a picture using a flash at ISO200, f/5.6, 1/30s
sync for ambient

Notice the ambient light in the back ground? Because the shot was taken at 1/30s, the shutter was slow enough to let in the ambient. The flash was set to expose the subject only.

Now, basically the exact same shot, except this time, the shutter was set at 1/800s.
high speed sync

As you can see, the flash's light intensity was still the same to correctly expose the subject, but because the shutter was set to 1/800s, it allowed a lot less ambient light through. So, if the shutter has little effect on the light from the flash, what does? Other than changing the flash setting, the aperture has a distinct direct effect on the light from the flash. Of course, the ISO also has a pronounced effect on the light from the flash as well.

Again, have fun with it and shoot shoot shoot...take picures, make a note of your settings and experiment! :)

This is just a quick start. More strobist stuff to come...especially when we get to off camera flash! That's when the real fun begins.

Friday, October 23, 2009

What the heck is the triangle?

The triangle. The three basic things that produces your image (exposure) in your camera. This blog is not about the lengthy details of all the technical stuff. It's about keeping it simple so that you can get a quick basic understanding of how things work. If you want to learn the details, there are tons of links on the web and books you can check out at your local library.

The triangle. As I posted before, is the relationship of the three primary functions of your camera that produces the exposure, ISO, Shutter Speed and Aperture. Lets take a quick look at each and what they do first.

ISO - this is the sensitivity of the sensor (or the film) to light. The higher the ISO the more sensitive to light. But, there is a catch, the higher the ISO, the more noise you will get. Some DSLR are better are controlling noise than others. What is acceptable is up to you. The Nikon D700 (and a few others) are considered one of the best DSLR when it comes to high ISO noise reduction.

D700 nikkor 24-70mm f/2.8 @ 24mm f/5.6 ISO 6400 1/20s hand held:
365.032 - ISO 6400!

Shutter Speed - this is simple. How fast the shutter opens and closes. Obvious, the fast (shorter) the shutter speed, the less total light it will let pass. Of course, it will also affect subject motion, either help freezing it or show movement (blur effect). Look at the picture above, I purposely shot it at 1/20s so that I can show some motion from the kids.

Aperture - the size of the hole that lets the light pass to the shutter. This is rated by the f/stop. The smaller the f/stop, the wider the hole. So, for example, f/1.8 will be a big hole compared to f/11. This also affects the depth of field (DOF). DOF is the area that will be most in focus. This is also seen most often as the blur back ground in photos you see. People tend to refer to the f/stop as the speed of the lens (we'll talk more about aperture (f/stop) another time).

The shot below was taken with my D700 + Nikkor 85mm f/1.8D at f/1.8. Notice how shallow the DOF is? There is even a noticeable difference between her eyes with the slight angle of her face to the camera!

D7D_8045

The primary relationship of the triangle is how they each affect each other when it comes to light. Remember, the amount of light getting to your DSLR sensor is what your exposure will end up to be. Here's a quick sample:

I'm taking a picture and the proper exposure with existing light at ISO 100 is with an aperture f/4 and shutter speed of 1/60s. Let's say this was a picture of my kid walking. At 1/60s there is a good chance there would be motion blur, so I want to use a faster shutter speed. Well, if I do that, then it will let in less light for the given time the shutter opens and closes, and if I keep the other two settings the same, I will under expose. What can I do?

Yup, change one of the other two settings as well. In this case, I want to keep the DOF of f/4 and bump the shutter speed to 1/125s, which is what is called 1 full stop (we'll cover this more in another post). With the aperture static at f/4, I need to change my ISO one stop to match the one stop change I did with the shutter speed. To do this, I would go to ISO 200. Now, I will have less chance of motion blur and still maintain the same exposure as before. Pretty simple!

I'm sure I will say this over and over in my various blogs...the best way to learn is to try it and see. Go out there, set the camera to Aperture Priority, ISO to 200 and the aperture to f/5.6. Now point the camera at a subject to get an exposure. Take a picture. Note the shutter speed the camera chose. Now, set camera to Manual mode. Set all three to what the camera chose before, except change aperture to f/8. Take the same picture as before. Note how much darker the picture is now. Now, change the ISO to 400 and take another shot. It should be about the same as when you first took the shot.

There you go. Now you know the triangle! :) The best thing about DSLR is, it basically cost you nothing to take pictures and you get instant feedback on the LCD screen, although, the LCD can be limiting in details...but it sure beats the heck out of film. So, have fun with it and shoot away. Take notes on what you did and how it turned out. Before you know it, you'll be an expert at the triangle!

As I noted, the triangle's primary effect is the exposure of the image, but all three have their own individual effects as well, like DOF. We'll get into more of this next time.

Thursday, October 8, 2009

Greetings

Welcome to the jwang photography blog.

I started this blog for fun. Photography is my passion and I thought it would be fun to post what I'm doing, what I learn and stuff that might help others.

My passion in photography right now is people photography. If anyone has the time to strike a pose, I'll make the time to take a picture :) I also shoot other stuff as well, like landscapes, abstract, macros...etc.

I am always shooting. I also try to do some professional work here and there, when I get a chance. I find that this also motivates me to look at my work differently and drives me to learn more.

My posts are not for general discussions. As I noted above, it's for fun and it's about what I do. If you read a post about my photography and have a photography question or something to add, please feel free to submit a comment. I love to hear from you, but forget about trolling, arguing, spamming...etc because I have to approve each comment before they are posted and garbage will end up in the garbage can.

Enjoy