Wednesday, January 27, 2010

DIY Heart Pillow

:) Took this shot as a quick test shot with the DIY softbox I made this past Saturday. I will post about the DIY softbox this coming weekend when I have more time. Thought I throw this up real quick for the Gallery
D7D_3971

Here's different version processed by Trish
D7D_3971_b

Sunday, January 24, 2010

Beauty Dish v.3

There are a ton of how to DIY beauty dishes out there. I'll spare the details on the step by step here. I basically chose the 18" planter bowl from Lowes for my DIY dish. I think there are much cheaper ones at the dollar store, but a bit smaller. I might have to check them out soon.

Anyway, here's v.1. I used a electrical box since I made this for the Vivitar 285HV. The head on the flash is quite large, so I needed something larger than the standard downspout you see that are very popular. (I did get a downspout for a different project though)
DSC_6974

Very basic. I painted it and used a CD with foil to make a convex reflector, and some crude mounting...just drilled a hole so the tripod 1/4" screw can poke through and just put a nut on it to lock it down.
DSC_7005

With v.2, I changed the reflector and used a convex mirror from Walmart. Just glued the mirror to the CD and mounted it to the two screw posts.
DSC_7098

Added a rebar so I can use the umbrellas holder.
DSC_7101

This did not work very well. Added too much weight. The 18" dish was already pretty heavy as it is. I have not used the dish too much, so I have not really thought about updating it, and then this past weekend, I got an idea from the DIY softbox I read on the web. So, here's v.3

3/8" x 4" bolt, with some washers and now I can screw it into the umbrella adapter or just stick in directly into the umbrella holder. Just don't forget, I made this for my Vivitar 285HV, which has the wide head. I have an idea where I can make a locking mod and template so that I can fit a smaller flash head in it as well, but I have one dish and if I'm going to use it, I'll just stick the 285HV in it for now.
Beauty dish v.3

DSC_8429

DSC_8430

That was not the end of it. All this time that I had the dish, I never really tested the light pattern/throw. So, I decided to test it since I think the dish is much more usable now. To my surprise, where I had the reflector, the light throw was just BAD.
DSC_8434

So, I moved the reflector closer to the flash head and tested, and moved it, tested it...until I was happy. If you make one, be sure to test and adjust so that you get a nice even light throw.
DSC_8442

Here's a sample shot from the updated beauty dish.
D7D_3967
Photo detail:
D700 w/Nikkor 85mm f/1.8D @ f/3.5
ISO 640
1/200s
Triggered with CTR-301p

Here's the setup shot.
DSC_8474


I worked on a few DIY stuff this weekend. More to come...

Tuesday, January 19, 2010

Beauty shot

so, I watched this video on kelbytraining.com and it was about a beauty shot with a big soft box behind the subject and a beauty dish over head. I don't have a big soft box, but I do have a DIY beauty dish. Looking around, I had a DIY light diffusion panel made from some pvc pipes. This was very simple, throw a white sheet over it, and instant light panel.

DSC_8381

In an attempt to learn about back lighting the subject, I gave it a shot.
set up shot

Here's the end result.
D7D_3905

Some details. The panel is pointed up behind Ashely so that is it not directly at the camera. I have a Sunpak behind to light the panel. I took a few test shots with just the panel light to get a feel for the light wrapping around Ashely's face. Remember, her face will be very under exposed and the shot will look washed out. This is ok since you can correct a lot of this in post.

Once I felt comfortable with the back light, I added the beauty dish, which is using the Vivitar 285HV. To lighten up the shadow under Ashely's chin, as you can see, she is holding a silver reflector. This is really a car shade from Costco, about $7.

This is a first attempt, so it's not great or anything, but you can learn from it. I plan to buy a soft box soon (a large one) for the Flashpoint mono light I have and then make a couple of small ones for my flashes. I think I will make a 24"x24" for the Sunpak first. I will probably come back and shoot this again when I have a soft box.

Sunday, January 17, 2010

Clamp it

I bought two medium sized clamps from Lowes a while back. If you start to shoot with lights and back drops...etc., you need clamps. Small, medium, large...they all come in handy. This weekend, it hits me. Turn the two medium duty clamps to more than just a clamp. Turn them into remote flash holders!

This is actually very simple. First off, you need to have some 1/4" bolts. I had already picked up a small pack from Walmart a long time ago for some other purpose, so I have plenty of spares. Took the clamps out to the garage and less than a minute later, drilled a hole in each to fit the bolt through. Note, I found a couple of lock washers laying around. Be sure to use them.
D2A_0368

When you buy an umbrella holder, it comes with female and male adapters. Just take the female adapter and screw it on to the bolt on the clamp.
DSC_8393

Note, I recommend using the nut that comes with the bolt to lock the bolt to the clamp. This way you can easily remove the umbrella adapter any time and not have to worry about the loose bolt.

Use it in all kind of places. With just the flash.
DSC_8395

With an umbrella
DSC_8398

Places where you can't put up a light stand
DSC_8402

Same shot as above, just had Chloe look at me and I zoomed in a bit.
DSC_8403

Get creative with it. Need more power? Add it to a light stand and use two flash.
D2A_0373

You can still shoot it thru an umbrella!
D2A_0375

I found a small metal plate and then drilled a hole in the center. Bolt it to the light stand. The light stand comes with a built in 1/4" stud already. Now you can easily clamp two lights. I'm sure it would not be too hard to come up with some easy DIY rig to mount a longer bar across so you can mount/clamp 3 or 4 lights! Now you have some real power :)
D2A_0378

Took it outside for a quick test. Early afternoon, overcast. D200, 35mm f/2 at f/8, 1/250s, ISO 200. Triggered from about 35' away with CTR-301p. Note how dark the shaded area is under the patio.
D2A_0386

Turn the flash toward the patio and took the same shot from the same spot as above.
D2A_0387

Just to test the power of the two lights, took another shot with the aperture set to f/11.
D2A_0388

Have some fun and get creative on how you can use your new off camera flash clamp :)

Saturday, January 16, 2010

DIY Snoot

One of the easiest light modifier to get started with is the snoot. I also realized that I wrote a quick blog already, so I will just link it here and add a bit more here.

http://jwangphoto.blogspot.com/2009/11/snoot-and.html

Along with some gels, you can have some real fun! Here's one I shot with two lights in my living room. I snooted and used a DIY grid for the light behind camera left, to give it a "spot light" effect. The light behind Chloe is just a sunpak with a blue gel on it.
American Idol - 4

Here's a single light, snoot with a diy grid.
D7D_0565

The DIY grid I made was just some cut straws glued together.

here's another two light setup:
coffee

strobist info:
Sunpak 422D camera left at 1/8 w/diy snoot and grid and 1/4 CTO. About 8' from cup.
Sunpak 30DX camera left, behind the cup at 1/16 w/diy snoot and 1/2 CTO. About 4 1/2' from the cup.
All triggered with CTR-301. D700 w/70-200VR at 200mm f/4, 1/30s ISO 250

Speaking of gels, I blog about this as well.
http://jwangphoto.blogspot.com/2009/10/gels.html

Thursday, January 14, 2010

triggers

Since this is targeted for people just starting out, the emphasis will be on cost, so I will be focusing on the CTR-301p, which is the lowest cost, off camera flash trigger that I can speak about and highly recommend. There are many many different trigger systems, including the RF-602s, I can say I have put my CTR-301p through it's paces and for the price, if they stopped working tomorrow, I would have gotten my money's worth.

The CTR-301p is very simple and easy to use. A set of one transmitter and two receiver can be had on ebay for about $42 shipped to USA location. I have bought from hkyongnuophotoequipment a few times and they have been very reliable.

I have two sets actually. The older CTR-301 and the newer CTR-301p. So, I basically have a backup transmitter and 4 total receivers. Since I generally only will use up to 3 lights, one can be considered a backup receiver as well.
D2A_0347

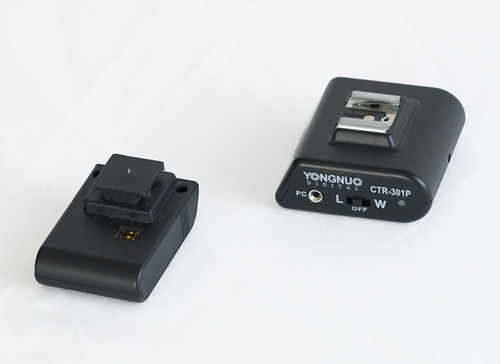
They work on just about any camera that has a standard hot shoe and most flash that I have seen. I've even triggered my flash with my $26 Holga! :) Now that I have a year under my belt, if I was looking for a new set of triggers, I would probably get the RF-602s. The only reason is because of the RF remote trigger for my D700. The Nikon remote by itself cost as much or more than the RF-602 I think...anyway...I've had the CTR-301p for a year and shot thousands of pics with it and it's been very very reliable for me.

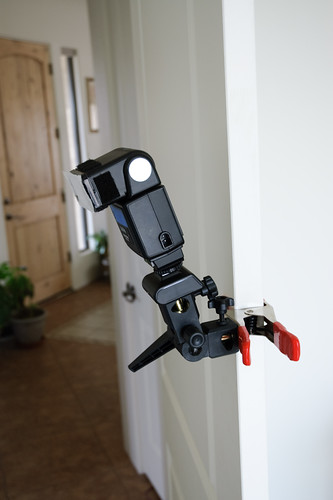
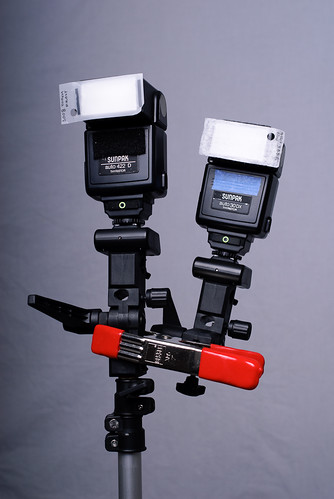
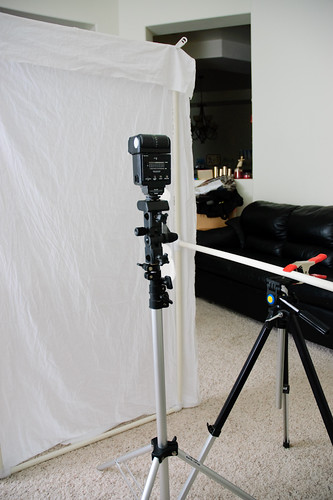
Here's a pic with them on the camera and flash.
D2A_0348

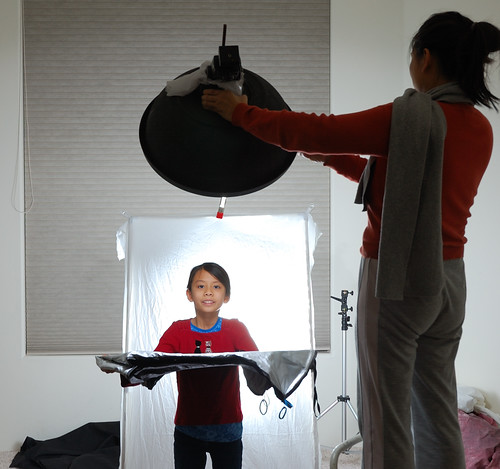
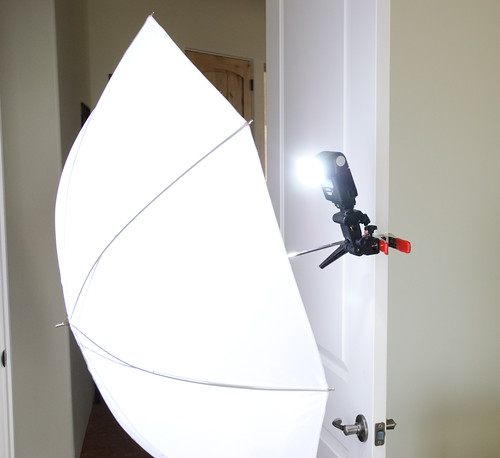
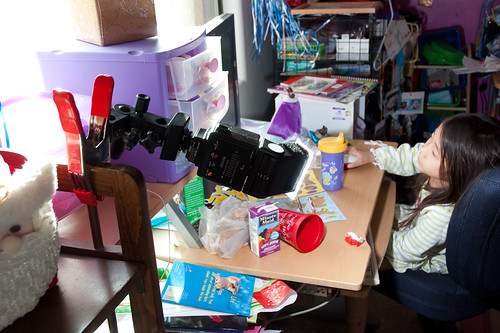
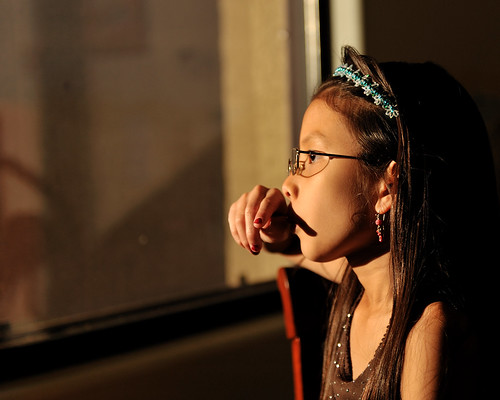
By the way, the pics above were shot with my two used ebay sunpaks with the CTR-301p trigger system. Here's the basic set up for the shots above. Note, this was super quick, two or three shots and done.

Two foam boards on a chair, then drape a white bed sheet over it. One light is sitting behind the home made diffusion panel. I'll get into DIY light modifiers in a near future blog.
DSC_8388

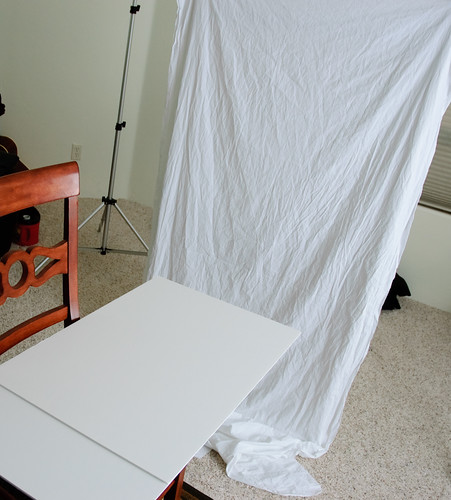
Again, very simple setup. There is a second light, behind the camera when I took the product shots above. It is pointing at the white wall behind me and bouncing back at the product on the chair.
DSC_8391

A few things to point out from my use of the CTR-301p.

* it uses non-conventional batteries, instead of AA or AAA. I have not changed out any of the batteries since I got them except for one CR2 in one of the receiver. I think I left the receiver on for a few days, which did not help I sure.

* The optical slave does not work well, or at all, in bright light. I don't mean under direct sun, I mean, even bright light coming in through the window. But for me, I never need to use the optical. I just use the RF to trigger.

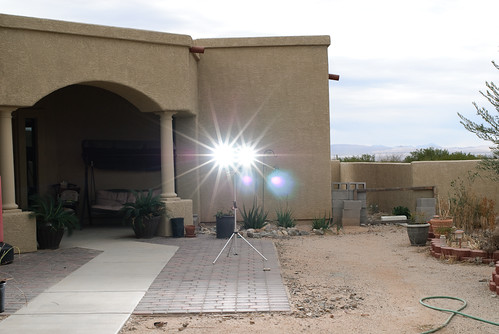
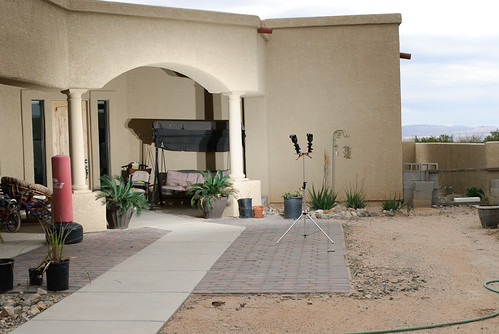
* They have very very good range. This was from about 120 feet away:
long range wireless :)

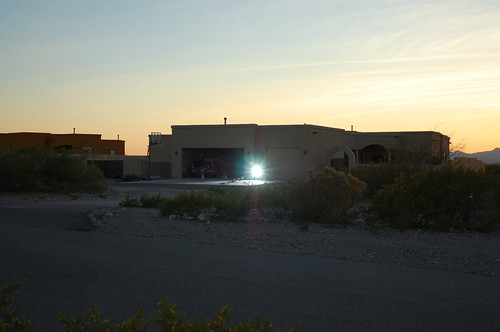
* Since they are RF, you don't need line of sight. This was shot with the light outside in the patio, with a wall between me and the flash. I am not sure if I could have triggered my SB-900 from where I took the shot.
contemplating...

So, that pretty much wraps it up for triggers. I think I will get into some basic DIY stuff for the flash and using them off camera next.

Monday, January 11, 2010

Back to the begining

Recently, a few people asked me about how to start shooting with the flash off camera. So I thought it would be good to start from the beginning. I will step through all the basics to get started.

First thing, of course, you need to have a flash! :) There are so many to start with, but the one most important thing to remember, if you are looking to get a flash, be sure the flash has full manual settings. DO NOT start with an Auto flash unless you already have one and want to play with it. Once you have more experience, you will be able to better determine what the next flash to get that will work the best for you.

Remember, there is no one answer that will fit everyone. I write about what works for me and try to put it in context so you can better use my information to help you make the right decision for you.

I have a number of flashes, including the SB-900, but for someone starting out, my favorite flash is the Sunpak variety. There are a few models to choose from. Again, any of the basic ones will work fine, as long as they are the full manual models. Here's two that you can find on ebay regularly for around $20 to $25 each.

twins

Notice that they have different model numbers, but look identical. It is because they are identical! :) Something to do with different markets, US model and Europe, or something like that...no matter, as long as they work.

Also, both have a wireless receiver already attached. These are CTR-301p. They do not come with the flash. I will get into this in the next blog.

These types of Sunpak flashes can come with different hot shoe mounts. The most common are the generic, Canon, and Nikon. I think the Pentax are fine as well, but I've read that the Minolta's are not standard hot shoe types.

For off camera work, if you stick with the generic, Canon, and Nikon, you will be fine. It does not matter if you have a Canon or Nikon. I've shot with Nikon for 25 years, so I know Nikons, and a little about Canon, so if you are shooting with something else, then you may want to do a little more research. And, speaking of research, below are the two best places to start with:

http://strobist.blogspot.com/
http://www.flickr.com/groups/strobist/

By the way, this is going to center around wireless. So, next blog...wireless triggers...

Sunday, January 3, 2010

More from my trip to San Jose

A few more from my trip to San Jose last week for the Gallery :)

When there's good natural light, use it :)
D7A_3033

Straight out of the camera, no post edit done:
D7A_3038

Kylie sharing a moment with mom.
a moment with mom

Some rim light.
D7D_3219

Share More

Just a quick note that I plan to be more active in 2010 and to share more details as well as more ideas/thoughts/what I'm learning. And, I will post more "gallery" pics, more often.