
Monday, February 21, 2011
52 weeks - 2011
I start a 52 weeks project on http://www.flickr.com/photos/wangster411/sets/72157625765422860/
Sunday, December 26, 2010
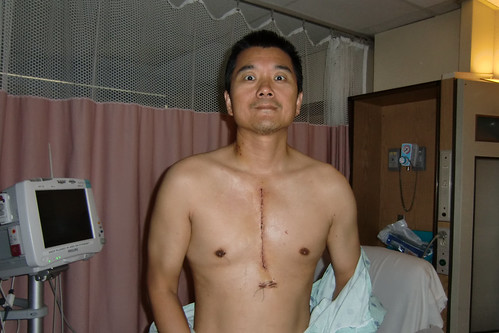
I had a heart attack and stroke...
Feb 9, 2010, I have a heart attack. On Feb 18, 2010, I had a stroke. It was on my left, which meant my right side of a body became paralyze...head to toe...
I recover some of a paralyze...I can walk and take pictures, but still have a numbness on the right side...also, I have a long way to go because of my speech and write...
I had a tripe by-pass operation on June 14, 2010.
I will try to publish when I get better...
I recover some of a paralyze...I can walk and take pictures, but still have a numbness on the right side...also, I have a long way to go because of my speech and write...
I had a tripe by-pass operation on June 14, 2010.
I will try to publish when I get better...
Sunday, February 7, 2010
DIY softbox II
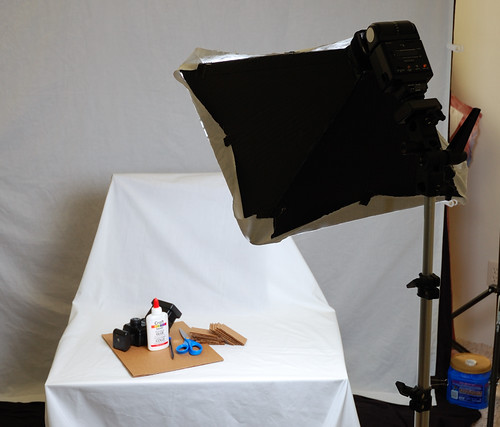
Wow, the days can just fly by. So, the last post we ended with cutting out the pieces of the cardboard for the softbox. Instead of going into more details about the cardboard box, I'm going to start on the foam board softbox. Here's some things to keep in mind about the cardboard box though.
The cardboard is brown, so you need to either paint the inside white or line it with baking foil. I have some 3M spray glue, so I just glued some baking foil. I also glued the cotton diffusion cloth to the front of the box. This cardboard diy softbox was just to get some experience under the belt :)
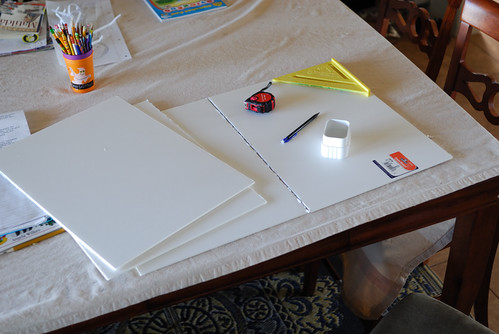
Now, onto the foam board DIY softbox. (note, this is not some original idea I had. There are a number people that's done this as well) The same idea applies to the cardboard softbox as well. You can get these standard size foam boards at any art store. I got mine on sale for $1.50 each at JoAnne Fabrics. To keep it simple I just cut the pieces in half, down the center:
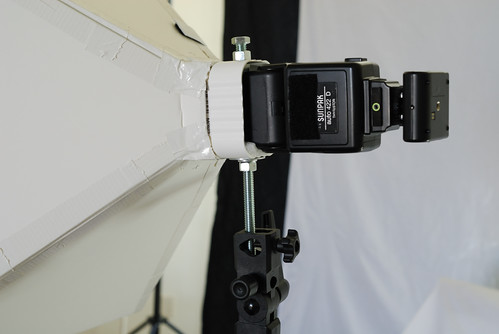
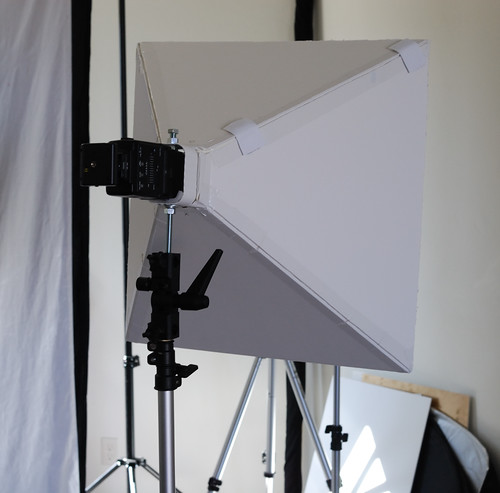
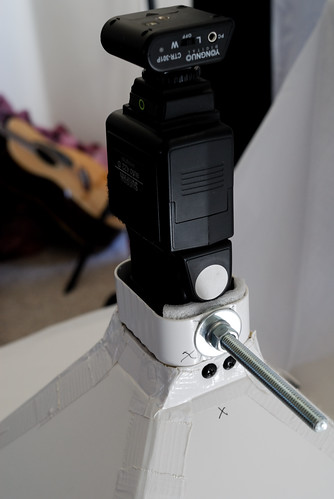
I also picked up a rain gutter down spout from Home Depot. This fits very fell for my Sunpak 422D. It is a very tight fit for a SB-900 though, since you need to run a bolt on one side for a simple umbrella holder mount, but you can use a different mount, which then will allow for a better fit on your SB-900.
Once you have the pieces cut in half, do the same measuring and cut like I explained in the previous post. It should look like this:

I used white duct tape to tape the pieces together. I did mine so that they can actually fold. I used some Velcro on the last side so that you can undo that edge, other wise you can't fold it up.
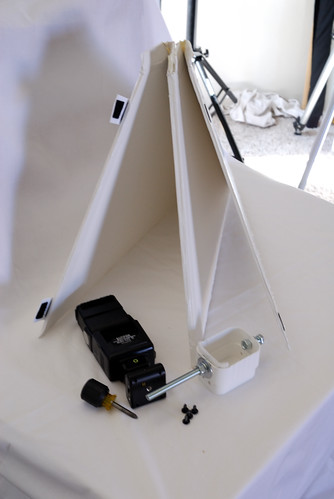
I marked one side of the spout and foam board so that the screw holes match the correct side. i drilled two holes on each side to secure the softbaox to the spout. Once this is done, I drilled two more holes, one on each of the short edge. Got a 4" long 3/8" bolt and bolted to one end. This becomes the mounting rod for the umbrella holder. The other side can be used with another 3/8" bolt to secure the flash head. This works for my Sunpak 422D. Depending on what flash you have, this may not work. For example, the down spout will not work at all for a 285HV because the flash head is way too big. Just an idea, if you are making one for the 285HV, you can get some L brackets to create the "box" end of the softbox. Obviously, you will have to think about how to mount the softbox and flash to a light stand.
Here's a view of the mounting:
Here's the Velcro edge. I'll probably add another Velcro piece in the center. This was just a quick pic right after making this. So far, after a few weeks, it's still holding fine.
A few more pics of the softbox:
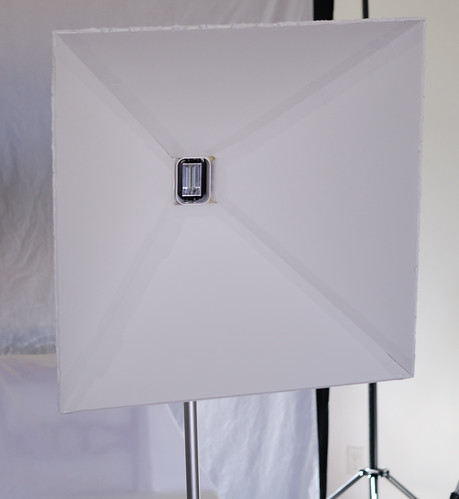
I cut the cotton cloth and stapled some Velcro to the cloth, and glued the other side of the Velcro to the edge of the softbox. By the way, I buy the industrial strength Velcro which have glue backing built in.
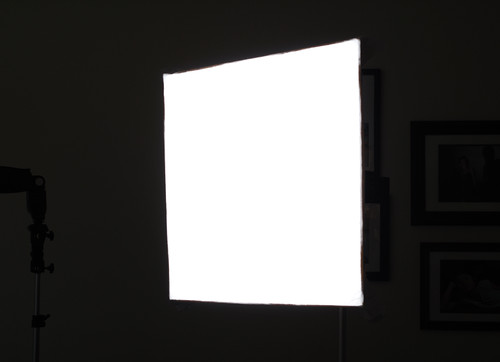
Here's a quick test shot using the Sunpak 422D. Notice the soft shadow from Ashley's glass frame on her face.
Here's another quick shot I took yesterday under bright sun light in the back yard, using a SB-900 in iTTL and my old school manual focus 80-200mm f/4 ais lens :) No post processing to the picture itself, just a bit of EV bump and a crop.

I'm planning to do another softbox with the foam board as is. This will be a rectangle softbox running 40" long. I can't remember the length of the short side, but it does not matter, whatever the size the boards are, it will be :)
The cardboard is brown, so you need to either paint the inside white or line it with baking foil. I have some 3M spray glue, so I just glued some baking foil. I also glued the cotton diffusion cloth to the front of the box. This cardboard diy softbox was just to get some experience under the belt :)
Now, onto the foam board DIY softbox. (note, this is not some original idea I had. There are a number people that's done this as well) The same idea applies to the cardboard softbox as well. You can get these standard size foam boards at any art store. I got mine on sale for $1.50 each at JoAnne Fabrics. To keep it simple I just cut the pieces in half, down the center:
I also picked up a rain gutter down spout from Home Depot. This fits very fell for my Sunpak 422D. It is a very tight fit for a SB-900 though, since you need to run a bolt on one side for a simple umbrella holder mount, but you can use a different mount, which then will allow for a better fit on your SB-900.
Once you have the pieces cut in half, do the same measuring and cut like I explained in the previous post. It should look like this:
I used white duct tape to tape the pieces together. I did mine so that they can actually fold. I used some Velcro on the last side so that you can undo that edge, other wise you can't fold it up.
I marked one side of the spout and foam board so that the screw holes match the correct side. i drilled two holes on each side to secure the softbaox to the spout. Once this is done, I drilled two more holes, one on each of the short edge. Got a 4" long 3/8" bolt and bolted to one end. This becomes the mounting rod for the umbrella holder. The other side can be used with another 3/8" bolt to secure the flash head. This works for my Sunpak 422D. Depending on what flash you have, this may not work. For example, the down spout will not work at all for a 285HV because the flash head is way too big. Just an idea, if you are making one for the 285HV, you can get some L brackets to create the "box" end of the softbox. Obviously, you will have to think about how to mount the softbox and flash to a light stand.
Here's a view of the mounting:
Here's the Velcro edge. I'll probably add another Velcro piece in the center. This was just a quick pic right after making this. So far, after a few weeks, it's still holding fine.
A few more pics of the softbox:
I cut the cotton cloth and stapled some Velcro to the cloth, and glued the other side of the Velcro to the edge of the softbox. By the way, I buy the industrial strength Velcro which have glue backing built in.
Here's a quick test shot using the Sunpak 422D. Notice the soft shadow from Ashley's glass frame on her face.
Here's another quick shot I took yesterday under bright sun light in the back yard, using a SB-900 in iTTL and my old school manual focus 80-200mm f/4 ais lens :) No post processing to the picture itself, just a bit of EV bump and a crop.
I'm planning to do another softbox with the foam board as is. This will be a rectangle softbox running 40" long. I can't remember the length of the short side, but it does not matter, whatever the size the boards are, it will be :)
Wednesday, February 3, 2010
DIY Softbox I
ok, been super busy, so I've decided to post the DIY softbox project in parts.
The first part is the super simple one. Before I decided to make a 20" softbox from the standard art foam boards, I used some cardboard to practice with. Here's the end result of the cardboard softbox.
This is pretty simple really. Just get some cardboard boxes. I just cut each side into their own pieces. You need 4 pieces, so you may end up cutting up another box. It really depend on how large the box is. Keep in mind, this is just practice, so you don't need a large softbox. In my case, I think they ended up to be about 16".
Once you have the four pieces, just get a straight edge. Measure the flash head. The flash head will be a rectangle, so you need the long edge and the short edge. Next, decide how long the head will stick into the softbox.
Here's an example, say the flash head is 3" x 2" and I want the head to sit 3" into the box. Now find the center of the back edge of the cardboard. This is the edge that you will put the flash head into. For example, if the carboard is 16" wide, then the center will be 8". Your long edge of the flash head will be 3" / 2 = 1.5" each side from the center. So, just mark the edge 1.5" from the center to each side. Since the head sits in 3", draw up from each edge marking up 3". Basically you have a rectangle drawing in the center/edge of the box after.
Once you have marked the the edge noted above, take the straight edge and start at the top edge's corner. Left and right. Draw a line from each corner to the corner spot inside from the edge from your marking above.
Now do the same for another piece just like the above one. Using the same idea, do the same for the other two pieces, except this time, your are only marking 1" from the center to each side. Remember, this edge is for the short edge of the flash head which is 2".
Now that you have all the pieces marked, just cut the sections out.
More tomorrow...
Monday, February 1, 2010
got side tracked
Ok, I promised that I would write about the softbox this past weekend, but I got side tracked a bit. This Sat. I picked up a Ducati 1098S, so for now, I'll throw up a couple pics for the gallery. :)


These were just real quick shots outside the house Sunday morning. Yea, was a bit excited the next morning. :) Both pics were post processed by Trish.
I will try and get the DIY softbox details this week...
These were just real quick shots outside the house Sunday morning. Yea, was a bit excited the next morning. :) Both pics were post processed by Trish.
I will try and get the DIY softbox details this week...
Wednesday, January 27, 2010
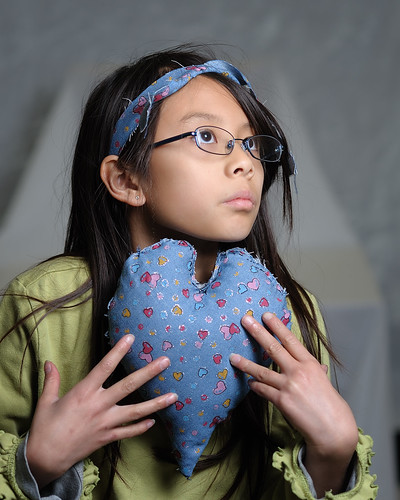
DIY Heart Pillow
:) Took this shot as a quick test shot with the DIY softbox I made this past Saturday. I will post about the DIY softbox this coming weekend when I have more time. Thought I throw this up real quick for the Gallery
Here's different version processed by Trish

Here's different version processed by Trish
Sunday, January 24, 2010
Beauty Dish v.3
There are a ton of how to DIY beauty dishes out there. I'll spare the details on the step by step here. I basically chose the 18" planter bowl from Lowes for my DIY dish. I think there are much cheaper ones at the dollar store, but a bit smaller. I might have to check them out soon.
Anyway, here's v.1. I used a electrical box since I made this for the Vivitar 285HV. The head on the flash is quite large, so I needed something larger than the standard downspout you see that are very popular. (I did get a downspout for a different project though)

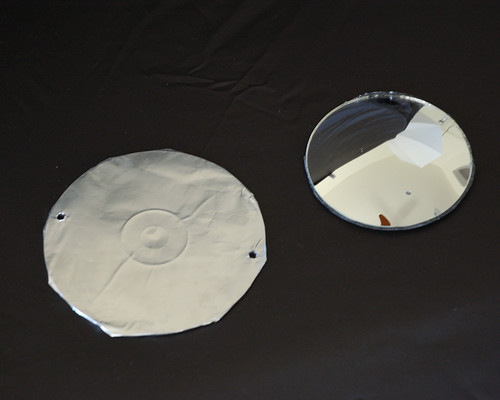
Very basic. I painted it and used a CD with foil to make a convex reflector, and some crude mounting...just drilled a hole so the tripod 1/4" screw can poke through and just put a nut on it to lock it down.
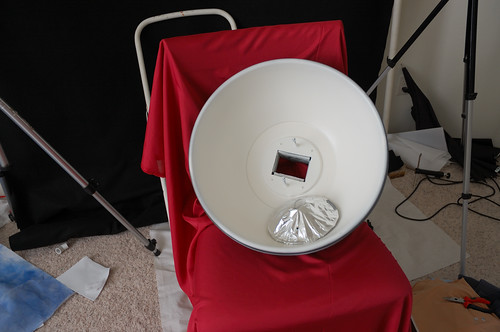
With v.2, I changed the reflector and used a convex mirror from Walmart. Just glued the mirror to the CD and mounted it to the two screw posts.
Added a rebar so I can use the umbrellas holder.

This did not work very well. Added too much weight. The 18" dish was already pretty heavy as it is. I have not used the dish too much, so I have not really thought about updating it, and then this past weekend, I got an idea from the DIY softbox I read on the web. So, here's v.3
3/8" x 4" bolt, with some washers and now I can screw it into the umbrella adapter or just stick in directly into the umbrella holder. Just don't forget, I made this for my Vivitar 285HV, which has the wide head. I have an idea where I can make a locking mod and template so that I can fit a smaller flash head in it as well, but I have one dish and if I'm going to use it, I'll just stick the 285HV in it for now.
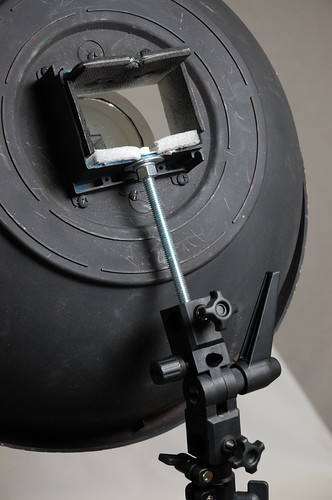


That was not the end of it. All this time that I had the dish, I never really tested the light pattern/throw. So, I decided to test it since I think the dish is much more usable now. To my surprise, where I had the reflector, the light throw was just BAD.
So, I moved the reflector closer to the flash head and tested, and moved it, tested it...until I was happy. If you make one, be sure to test and adjust so that you get a nice even light throw.
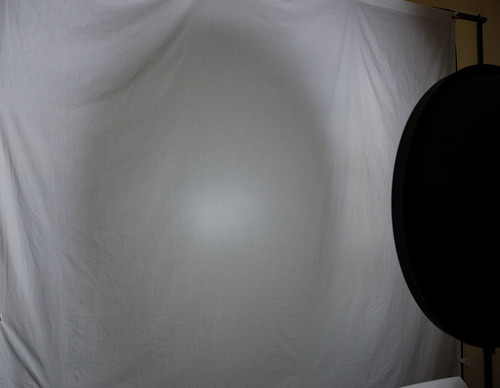
Here's a sample shot from the updated beauty dish.

Photo detail:
D700 w/Nikkor 85mm f/1.8D @ f/3.5
ISO 640
1/200s
Triggered with CTR-301p
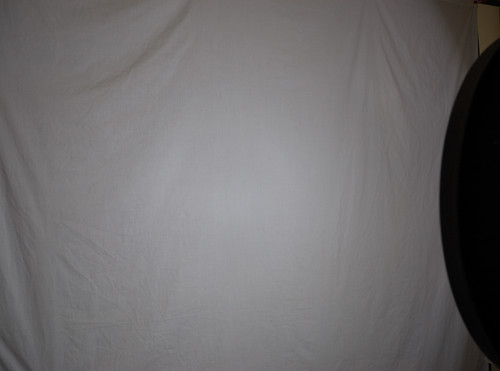
Here's the setup shot.

I worked on a few DIY stuff this weekend. More to come...
Anyway, here's v.1. I used a electrical box since I made this for the Vivitar 285HV. The head on the flash is quite large, so I needed something larger than the standard downspout you see that are very popular. (I did get a downspout for a different project though)
Very basic. I painted it and used a CD with foil to make a convex reflector, and some crude mounting...just drilled a hole so the tripod 1/4" screw can poke through and just put a nut on it to lock it down.
With v.2, I changed the reflector and used a convex mirror from Walmart. Just glued the mirror to the CD and mounted it to the two screw posts.
Added a rebar so I can use the umbrellas holder.
This did not work very well. Added too much weight. The 18" dish was already pretty heavy as it is. I have not used the dish too much, so I have not really thought about updating it, and then this past weekend, I got an idea from the DIY softbox I read on the web. So, here's v.3
3/8" x 4" bolt, with some washers and now I can screw it into the umbrella adapter or just stick in directly into the umbrella holder. Just don't forget, I made this for my Vivitar 285HV, which has the wide head. I have an idea where I can make a locking mod and template so that I can fit a smaller flash head in it as well, but I have one dish and if I'm going to use it, I'll just stick the 285HV in it for now.
That was not the end of it. All this time that I had the dish, I never really tested the light pattern/throw. So, I decided to test it since I think the dish is much more usable now. To my surprise, where I had the reflector, the light throw was just BAD.
So, I moved the reflector closer to the flash head and tested, and moved it, tested it...until I was happy. If you make one, be sure to test and adjust so that you get a nice even light throw.
Here's a sample shot from the updated beauty dish.
Photo detail:
D700 w/Nikkor 85mm f/1.8D @ f/3.5
ISO 640
1/200s
Triggered with CTR-301p
Here's the setup shot.
I worked on a few DIY stuff this weekend. More to come...
Subscribe to:
Posts (Atom)